

 www.cintronbeveragegroup.com ```html
 Introduction: Building Your Own File Cabinet
Are you tired of messy stacks of papers cluttering your workspace? Building your own file cabinet can be a rewarding project that provides a customized storage solution tailored to your specific needs and aesthetic preferences. This step-by-step guide will walk you through the process, from planning and gathering materials to assembly and finishing. Let's get started!
Step 1: Planning and Design
Before you pick up any tools, careful planning is essential. Consider the following: Dimensions: Measure the space where you intend to place the file cabinet. Consider the height, width, and depth. Number of Drawers: Determine how many drawers you need based on your filing requirements. Type of Files: Decide whether you'll be storing letter-sized or legal-sized files, as this will affect the drawer dimensions. Material Selection: Choose your preferred wood. Plywood is a cost-effective option, while hardwoods like oak or maple offer greater durability and a more refined look. Design Style: Sketch out your desired design. Will it be a simple box-shaped cabinet, or something more decorative? Consider the style of your existing furniture. Once you have a clear plan, create a detailed cut list with precise measurements for each component.
Step 2: Gathering Materials and Tools
Now that you have your plan, it's time to gather the necessary materials and tools. Here's a comprehensive list: Wood: Plywood, hardwood, or a combination, according to your design. Drawer Slides: Choose full-extension or standard drawer slides based on your budget and needs. Screws: Wood screws of various lengths for assembling the cabinet and drawers. Glue: Wood glue for strong and durable joints. Edge Banding (optional): For covering exposed plywood edges. Drawer Pulls or Knobs: Choose hardware that complements your design. Finishing Supplies: Sandpaper, stain, sealant, varnish, or paint. Tools:
- Table Saw or Circular Saw
- Miter Saw (optional, for precise angle cuts)
- Drill
- Screwdriver or Impact Driver
- Sander
- Clamps
- Measuring Tape
- Square
- Pencil
- Safety Glasses
- Hearing Protection
Step 3: Cutting the Wood
Using your cut list, carefully cut all the pieces of wood to the required dimensions. Cabinet Sides, Top, Bottom, and Back: Cut these pieces first, ensuring they are square and accurate. Drawer Fronts, Sides, Bottoms, and Backs: Cut these pieces next, paying close attention to the dimensions of the drawer slides. Shelves or Dividers (optional): If your design includes shelves or dividers, cut these pieces accordingly. Double-check all measurements before cutting to avoid errors.
Step 4: Assembling the Cabinet
Now it's time to assemble the main cabinet structure. Attach the Sides to the Bottom: Apply wood glue to the edges of the bottom piece and clamp the side pieces in place. Secure with screws. Attach the Top: Repeat the process to attach the top piece to the sides. Ensure everything is square before the glue dries. Attach the Back: The back piece can be attached using glue and screws, or with brad nails for a quicker assembly. Ensure the back is square to provide stability to the cabinet. Add Edge Banding (optional): If using plywood, apply edge banding to the exposed edges of the cabinet. Use an iron to activate the adhesive. Install Shelves or Dividers (optional): If your design includes shelves or dividers, install them using glue and screws. Ensure they are level and evenly spaced.
Step 5: Building the Drawers
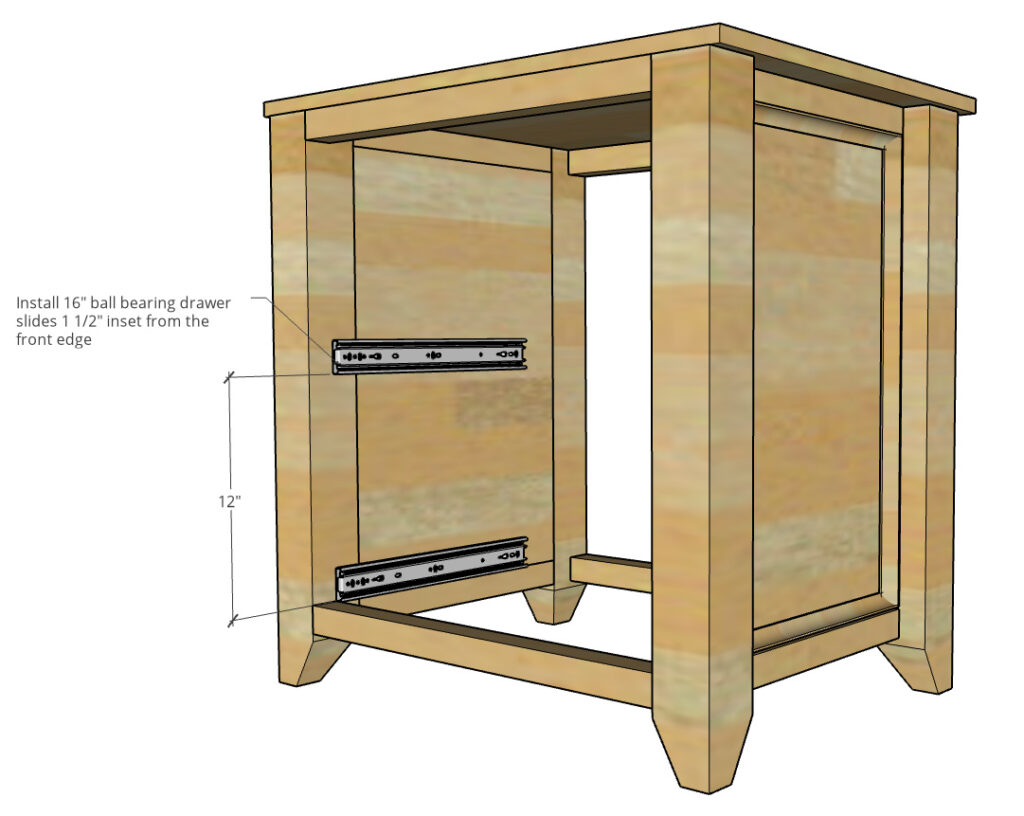
Next, assemble the drawers. Assemble the Drawer Sides, Fronts, and Backs: Apply wood glue to the joints and clamp the pieces together. Secure with screws or nails. Ensure the drawers are square. Attach the Drawer Bottom: Attach the drawer bottom using glue and screws or nails. Make sure the bottom is flush with the sides. Install Drawer Slides: Follow the manufacturer's instructions to install the drawer slides on the cabinet and the drawers. Ensure they are aligned correctly for smooth operation.
Step 6: Finishing and Hardware
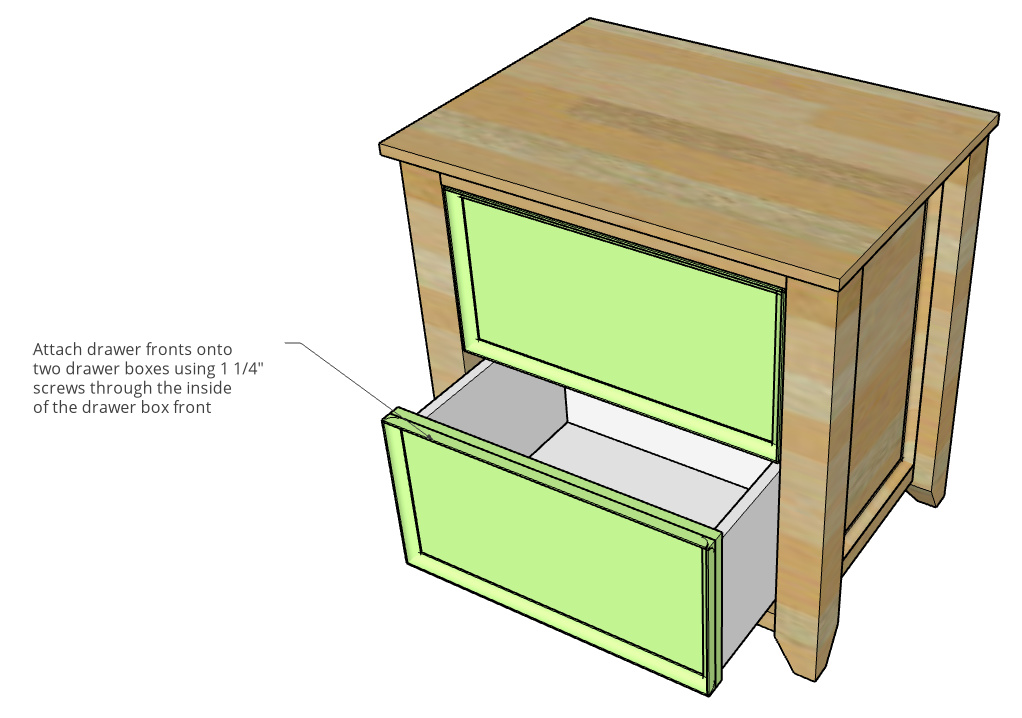
Now, it's time to sand, finish, and install the hardware. Sanding: Sand all surfaces of the cabinet and drawers to a smooth finish. Start with a coarse grit sandpaper and gradually move to a finer grit. Finishing: Apply your chosen finish, such as stain, sealant, varnish, or paint. Follow the manufacturer's instructions for application and drying times. Multiple coats may be necessary for a durable finish. Install Drawer Pulls or Knobs: Attach the drawer pulls or knobs to the drawer fronts using screws. Insert the Drawers: Carefully insert the drawers into the cabinet. Test the drawer slides to ensure they operate smoothly.
Conclusion: Enjoy Your Handcrafted File Cabinet
Congratulations! You've successfully built your own file cabinet. This custom-made piece will not only provide valuable storage but also add a personal touch to your workspace. Enjoy the satisfaction of creating something functional and beautiful with your own hands. Remember to regularly maintain your file cabinet to ensure it lasts for years to come. Now organize those papers!
``` Woodworking File Cabinet Plans
www.cintronbeveragegroup.com Woodworking File Cabinet Plans
 www.cintronbeveragegroup.com
 Woodworking File Cabinet Plans
 www.cintronbeveragegroup.com


0 komentar:
Posting Komentar